SCORM Bundler for Articulate Rise Courses
Combines several Rise modules into one SCORM course with a home page and a single completion status.
Download the tool (zip) Read the user guide
The download is a zip file. Unzip it, then open the HTML file in a web browser.
By downloading or using this tool, you accept the Terms of use. You use it at your own risk and on your own responsibility.
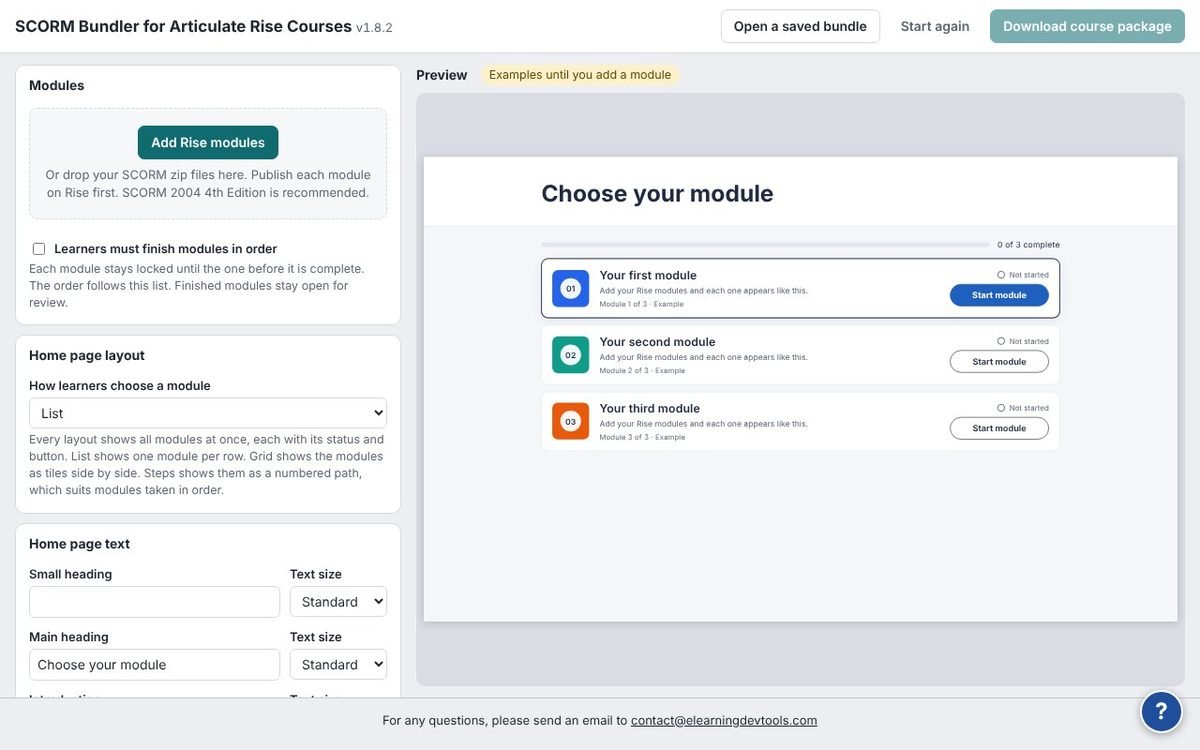
Problem
Rise publishes one SCORM package per course. When a program is divided into modules, the LMS lists them as separate courses, and learners do not see a single path from start to finish.
Solution
The bundler combines the Rise modules into one course package. Learners see a home page that lists every module with its status, and open each module from there. The LMS shows one course and marks it complete only when every module is complete.
Steps
- Publish each module on Rise as a SCORM zip file. SCORM 2004 4th Edition is recommended.
- Add the module zip files to the bundler and set their order.
- Edit the title, tag, summary, colour and picture of each module.
- Choose the home page layout (List, Grid or Steps), the text and the colours, and whether learners must finish the modules in order.
- Download the course package, upload it to your LMS and test it.
- To make changes later, open the course package again with “Open a saved bundle”.
Read the full user guide below. It is also inside the tool: select the ? button at the bottom right of the tool.
Compatibility
Modules published as SCORM 1.2 or any SCORM 2004 edition. The course package is built as SCORM 2004 4th Edition or SCORM 1.2. Requires a current version of Google Chrome or Microsoft Edge.
User guide · version 1.8.2
How to Combine Articulate Rise Courses into One SCORM Package
1. About the tool
SCORM Bundler for Articulate Rise Courses combines multiple Rise modules (a module is one independent course in Rise) into one package to be uploaded to the LMS. Learners open the package and see a home page that lists every module. The LMS shows the combined package as one course. The LMS course is marked complete only when every module is complete.
The home page shows one entry for each module you add. You can choose the layout, the order of the modules, the text and colors of the home page, and whether learners must complete the modules in order.
Terms used in this guide
| Term | Meaning |
|---|---|
| Module | A Rise course that is published as a SCORM zip file. |
| Course | A collection of modules that are packaged using the tool and uploaded to the LMS as one package. |
| Course package | The zip file that the tool creates. You upload this file to the LMS. |
| Saved bundle | A course package that you created earlier using the tool and open again in the tool to make changes. |
2. Before you begin
You need:
- The current version of Google Chrome or Microsoft Edge on a computer.
- The SCORM Bundler for Articulate Rise Courses link or file. The tool opens in your web browser and needs no installation.
- One SCORM zip file for each module.
- Permission to upload courses to your LMS.
To create each zip file, publish the module on Rise. The recommended format is SCORM 2004 4th Edition. The tool also works with earlier SCORM 2004 editions and SCORM 1.2.
3. Build a course package
Settings are on the left and a preview is on the right. Select a panel heading to open or close it.
The tool does not keep your modules, module details, pictures or font after you close or reload the page. To keep your work, download the course package and reopen it later with Open a saved bundle.
- Add your modules. In Modules, select Add Rise modules and choose your zip files.
- Arrange the modules. The order of the list is the order on the home page. Use the arrows or the drag handle to move a module. Select the X to remove it.
- Edit each module. Select a row to open its details, then enter the title, tag, summary, color, minutes and picture. Keep Finished or passed under Counts as complete when, unless the module was published on Rise with tracking by quiz result and a reporting option that reports a pass. In that case, you can choose Quiz passed only.
- Choose the home page layout. In Home page layout, choose List, Grid or Steps. Every layout shows all modules at once, each with its status and button. List shows one module per row, Grid shows tiles side by side, and Steps shows a numbered path.
- Set the module order (optional). Select Learners must finish modules in order. Each module then stays locked until the one before it is complete.
- Enter the home page text. In Home page text, review the Small heading, Main heading and Introduction. Use Text size beside each one to change its size, for example to make the course name larger than the main heading.
- Choose the colors (optional). Open Colors and change any item. If Hard to read appears, choose a darker or lighter color. Reset colors restores the defaults.
- Set the other options (optional). The home page uses the same font as your Rise modules. Fonts lets you add your own heading font file, if your font license allows this use. Button and status wording changes the words that learners see. Keep anything in {curly brackets}.
- Enter the course package settings. Open Course package settings and review these items:
- Course name in the LMS: the name that the LMS shows.
- SCORM version: keep SCORM 2004 4th Edition unless your LMS requires SCORM 1.2.
- Score sent to the LMS: send no score, the average module score, or the share of modules completed.
- When every module is done: keep the recommended option. Choose Exit normally only if completion does not register during your test in step 12.
- Check the preview. Check the titles, text and colors. The buttons do not open a module in the preview.
- Download the course package. Select Download course package and wait for the message Your course package is ready. Keep this file, because you need it to make changes later.
- Test the course package in the LMS. Upload it as a new course and open it with a test learner account. Assign it to learners after you confirm these points:
- A completed module shows Complete, and the LMS shows the course as in progress.
- Your progress remains after you close the course and open it again.
- If you set a fixed order, each module unlocks only after the one before it is complete.
- After you complete every module, the LMS shows the course as complete.
4. What learners see
Learners see a home page that lists every module with its status, and their overall progress. They select the button beside a module to open it: Start module, Continue module, Review module or Try again. The module to do next is highlighted.
All modules returns the learner to the home page. When every module is complete, the LMS marks the course as complete.
5. Make changes later
- Select Open a saved bundle and choose the most recent course package that you downloaded.
- Make your changes. To update the content of a module, publish it again on Rise, select its row and use Replace with a new zip file. The module keeps its text, and learners keep their completion.
- Select Download course package. The file name shows the next version number.
- Upload the file to your LMS as an update to the existing course, then test it.
For a course that learners have started, do not remove a module and add it again, because learners may lose their completion. Check with your LMS administrator before you update the course.
To start a different course, select Start again, then select it again within a few seconds to confirm.
For any questions, please send an email to contact@elearningdevtools.com